Showing posts with label Faber Castell gelatos and pitt pens. Show all posts

Sunday, March 9, 2014

'Flowers' Canvas...

Hello crafty peeps!  Its time again for another project featuring some Faber-Castell products!  Today I've got a little video-slideshow-tutorial on how I created this 6" x 12" canvas.  
Take a peek over on the Faber-Castell Design Memory Craft Blog for the full tutorial!

I used lots of Gelatos & Stampers Big Brush Pens.  If you've never tried Gelatos before you MUST!  They are my fav, my go to, my can't live without...lol.  They blend effortlessly with or without water, are compact, highly pigmented acid free color sticks that glide on creamy smooth (just like butter) for maximum color and coverage.  And the Brush Pens always finish things off beautifully.  These pens are all lightfast India Ink and have a durable brush nib for a multitude of uses!  Check 'em out HERE!


Maybe these flowers will spur spring on a little faster!  I've had enough of Winter!  Thanks for stopping by today!  Have a great week!

Supplies Used:


Friday, February 7, 2014

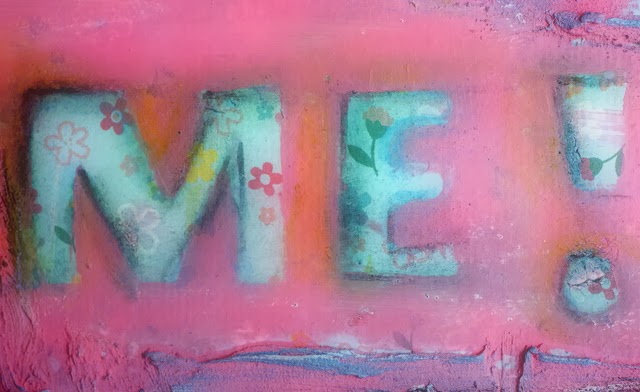
You've got a friend in me canvas...

What does one do with a truck load of creative energy after returning home from CHA?  Make a canvas!  I made this piece shortly after I got home.  The amazing inspiration walking around there was so overwhelming (in a good way) I was bursting at the seams with ideas.  I had so much creativity buzzing around inside my head I just had to let it out and this was the result.  

I took a blank canvas and a piece of patterned designer paper and adhered it to the entire surface using gel medium.  After it was good and dry, I took some alphabet 'thickers' and placed them on the canvas as a 'mask', making the saying "you've got a friend in me"...(gotta love Toy Story) - oh I removed some of the 'sticky back' by pressing the stickers on my pants so they wouldn't tear the paper off when I removed them.    I added some whipped spackle around the edges to give it some texture and 'grunge'.  Then I went to work with some heavy body acrylic paint in Pink mixed with a bit of white paint and water and covered the entire canvas being careful not to saturate around the alphabet stickers too much.  Once that was completely dry I carefully removed the alphabet stickers revealing the pretty flowered background.  Then to finish it off I added some shading and dimension to the letters using gelatos and pitt pens!  


Here's a close up of how to use the pens and gelatos to add more dimension to your work!  They blend so nicely over dried paint!  

Anyway, hope you enjoyed this little project, I know it found a good home!  Thanks Jo  ;)

Thanks for stopping by!  I hope you have a great weekend!

Supplies used:  Canvas, Designer paper, gel medium, gesso, acrylic paints, alphabet stickers, whipped spackle or modelling paste, gelatos, pitt pens.

Tuesday, January 28, 2014

Owl love you forever...and a little tutorial...

Hello fellow crafty people!!!  I'm back today with a little tutorial on how to use a digital image in your mixed media art.  Today I'm using the adorable Owl-ive The Owl Digital Stamp from By Lori Designs.  Its 'Inspiration Tuesday over at the By Lori Designs Blog so make sure you pop over and check out the amazing projects the dt has to show you! 

Ok, so lets get started!

I started by using a piece of Mixed Media Paper 6x8 (strong enough to hold lots of mediums, water etc...).  I printed off Owl-ive The Owl and adhered her to the paper using some Faber-Castell Gel Medium.  (Gel medium is very versatile as its great for extending the colour in paints, adhering collage pieces and adding texture and dimension to your work).

Once dry, I used some Dylusions Ink Spray and laid down some colour around the image.  I then used some heavy body Golden Acrylic Paint in (Pink) and painted the body of the owl.

I traced the eyelids and belly and paper pieced them with some patterned paper just to add some colour, depth and interest.  I also added some green and blue acrylic paint to the background, then went over it with some white gesso to lighten things up.  I cut out a tree branch from some co-ordinating patterned paper and lightly gesso'd over it as well. 

I added some more texture to the background using some stencils and paint.  I found some rubber grip shelf liner and used it to add some texture to the body of the owl and branch with some white gesso.  Then I wrote the sentiment "Owl Love you Forever" with a black pen and then the fun part began!  I got out my stash of Pitt Pens and Gelatos and went to town adding some fun colours to the edges of the paper.  I also shaded around the owl and its features to make them really come to life.

I hope you like Owl-ive the Owl!  You can grab your own digital file of her HERE and make your very own mixed media painting!!!  Try it, you'll love it!  

Thanks for stopping by!  Have a great week!

Products Used:

Sunday, January 26, 2014

More Art Tags from 2013!!!

Hello Bloggers!  So I think this is the last of the forgotten art tags of 2013!  It was a very busy year for me and sadly I just didn't have the time or energy to get "bloggy with it"!  BUT 2014 is a different story and I'll be back in action soon, YAY!  

This first tag is one of my favourites.  I used a bunch of acrylic paints, stencils, india ink, and a cool metal frame from Stampin UP painted with some white Tim Holtz distress paint.

I love this sentiment!

I ran this tag through my Cuttle Bug maching to emboss the surface.  Before I laid the tag inside the folder I added some distress paint so it would create a cool coloured background.  I then added more paint and went over the whole raised surface with some white distress paints.  I love this dry embossing effect!

 I did the same thing with this next tag and dry embossed it with a number embossing folder.  I added lots of paints and sprays, and a sentiment stamp to finish it off.  

This tag was made using some back ground stamps from Unity, different colours of sprays and inks, a cute fairy stamp from Unity, Faber-Castell Gelatos, and a sakura giltter pen to add some shimmer!

 I thought I would try to cover an entire tag with some Giltter Ritz that I have in my stash (that never gets used).  I forgot how awesome this stuff is!  Once you apply the glitter, simply burnish with your finger and the result is a glorious shimmery glittery finish you won't want to stop looking at.  The coolest part is that it feels like brushed suede and the sparkles will not rub off!  Added some glitter Thickers to finish!


This was a fun tag to do, lots of sprays, some fun Claudine Helmuth foam and clear stamps, washi tape and glimmer mist! 

 Not sure if you can see the sparkly goodness but its so pretty to look at in person.  You can never have enough sparkle!

 Well there ya go!  There will be many more to come in 2014 along with some journal pages, canvases, cards etc...I hope you enjoyed and found even a bit of inspiration!  Now go make something ;)

Thanks for stopping by!

Wednesday, November 13, 2013

FACEcinating Girls....Journal Page...

Hi, I'm back again.  Starting to get caught up a bit on my art journal posts.  Here is a page I did in the early summer when I took an online class with Andrea Gomoll.  (love love love her AND her work btw)!  

It's pretty 'trippy' I know but the whole Zentangle craze gave me an idea for her hair and I just went with it.  


Supplies used:
Facecinating Girls stamps, Golden Paints, copic markers, prismacolor pencils and gamsol, faber-castell artist pitt pens & gelatos, white marker pens, Derwent Inktense pencils (love these), stardust stickles, black copic multiliner.  

There are some funky black spots on her face from dropping my markers and stamps (yes I'm very clumsy), and I have to practice my noses, but I was pretty happy for my first attempt!


Once I finish the page beside it I will post the whole thing.  At a loss as to what to do...sigh!  Thanks for stopping by!

Monday, September 30, 2013

Just roll with it...& follow your heart...

 Here's another art journal page I completed a while ago. 

Supplies used:
Suzi Blu stamp, old book paper, peerless watercolors, prismacolor pencils, black sharpie, white paint pen, acrhivers ink, caran d'ashe neocolours, various background stamps...


Check out these fabulous blogs for tons of inspiration:

ARTISTS IN BLOGLAND